This post follows on from part one of this series.
This build has taken forever. My original plan was to have everything sourced in the UK. Alas, whilst there are some brilliant shops based in the UK, they didn’t have exactly what I need due to the layout I was after and the rarer, heavier switches I wanted.
It’s been fun and I’m typing this on the very keyboard I’m writing about. Read on to hear more about my new prized possession.
What I eventually ended up with
These links are from the actual companies I bought stuff from. No affiliate links.
The PCB
I went with the DZ60 PCB because of the sheer amount of layouts it can support:
It uses a ATMega32u4 Microcontroller which is a pretty standard Atmel chip (for future potential hacking) and also supports QMK firmware. QMK is the go-to in DIY mechanical keyboards and is extensively documented.
Oh & always remember to test your PCB before soldering no matter how shonky your method is (try not to stab yourself with Needle-nosed Tweezers as much as I did):
TIL needle nose tweezers are good for something other than accidentally stabbing yourself. My keyboards PCB works yisssss #mechanicalkeyboards pic.twitter.com/EHjfw7ciOX
— ☠️🎃 Rebecca Errorsmith 🎃☠️ (@beckycodes) 7 March 2018
The Plate (epic fail #1)
I should have thought more about the custom plate.
The highlight of my first post was about using the various online tools the mechanical keyboard community have created to easily draw up a plate for my custom layout (a CAD file basically). All well and good, if your switches actually clip into it. I made the mistake of going for 3mm Acrylic when I had mine made. The spec for the switch housing only allowed for 1.4mm. I could have glued the switches in but I wanted this to be a proper endgame keyboard and didn’t want to have any bodges.
Instead, I went for this plate from 1UP keyboards. It was pretty pricey and I had to pay ~£15 in import charges but I figure a big hunk of Brass will probably outlive me. Even if I ended up making a new keyboard, this plate can be easily recycled into another build because it’s my ideal layout.
Switches
I have read about switches far more than any normal person will in their life. There are 100s of switches available to you. I thought the choice was basically Cherry, Gateron or Topre. Oh no. In fact, this keyboard has ended up with three different switches in it.
My aim with the feel of this keyboard is accuracy and quiet. I will be writing code and it needs to not annoy my colleagues.
I had a look at all the different ‘silent’ switches available and then realised I’m actually quite a heavy typist so I should probably use heavier switches to avoid the keycaps bottoming out on the plate.
In typical style I’ve took this to the extreme and the keyboard now has a mix of Zealio 78g on the Alphas, 100g Aliaz Silents on the keys I tend to smash (tab, space) and Gateron Black 75g everywhere else. The gram measure is equal to the bottom out force. For comparison, a MacBook chiclet key is around 30g.
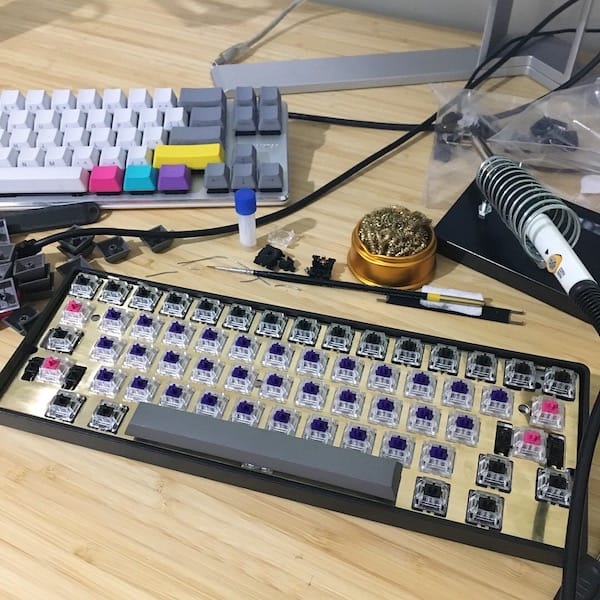
It feels bloody great. I was worried about typing fatigue but it feels fine so far. The heavy switches have helped with my accuracy too. I also hand lubed all the switches. I almost omitted that because using 4 hours of your life to paint some lube on switches is probably a bit weird but it’s definitely helped with the feel of the board.
Case
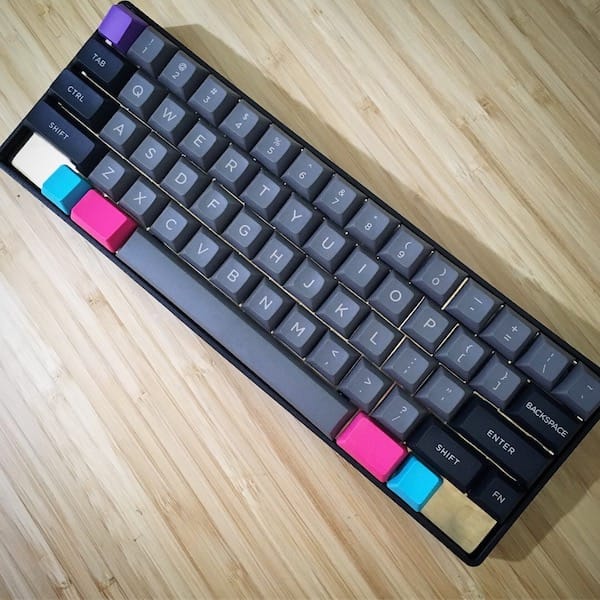
The case was an easy choice & thankfully very cheap unlike everything else for this keyboard. I just wanted something light that I could access the reset button on the PCB through. It’s just a simple plastic thing with no feet. Luckily it’s at the perfect angle and height for me.
Keycaps
I knew exactly what I wanted the keyboard to look like when I embarked on this project. I wanted it dark but with big readable legends so my pairing partners never had to hunt for keys if they wanted to drive using this keyboard (I usually have side print or blank keycaps). I went for DSA profile keycaps to further increase accuracy too. They’re also really thick and are very satisfying to type on. I stuck some CMYK keycaps from a different mold on there (making keycap purists cry in the process) but I think it looks cool af.
Done
There’s less images than I planned in this post. Most parts arrived as a bit of a surprise on the Saturday of the Easter Bank Holiday weekend and in my excitement I went wild and built it there and then. This was never meant to be a complete build guide because there are plenty of those on the internet. If you have any questions or want to see anything specific I’m always very happy to chat about keebs!